

In today’s world, mobile photography has become increasingly prevalent, with smartphones transforming into powerful tools for capturing stunning images. Phone cameras offer unprecedented accessibility and convenience, empowering anyone to document moments, express creativity, and share their perspective with the world. This comprehensive guide, “Elevate Your Mobile Photography: Mastering the Art of Phone Camera Photography,” aims to equip aspiring mobile photographers with the knowledge and techniques necessary to transcend the limitations of their phone camera and achieve professional-quality results. Whether you are a complete beginner or an experienced photographer looking to expand your skillset, this article will delve into the essential aspects of mobile photography, from composition and lighting to editing and post-processing.
From understanding the nuances of exposure, focus, and white balance to exploring advanced concepts like depth of field and long exposure photography, “Elevate Your Mobile Photography” will provide you with a practical framework for mastering the art of phone camera photography. Discover the secrets to capturing breathtaking landscapes, compelling portraits, and captivating close-ups using just your phone camera. This journey will unlock the full potential of your device and transform your everyday snapshots into impactful visual stories. Uncover the power of mobile photography and elevate your images to new heights.
Understanding Your Phone’s Camera Settings
Familiarizing yourself with your phone’s camera settings is the first step towards taking truly stunning photos. Don’t just rely on the automatic mode; unlock the potential of your device by exploring the various options available.
Start with the resolution. Higher resolution captures more detail, which is ideal for large prints or cropping later. However, it also takes up more storage space. Consider your needs and adjust accordingly.
Next, learn about ISO. This setting controls the sensor’s sensitivity to light. Lower ISO is best for bright conditions, while higher ISO is necessary for low-light situations. Be aware that increasing ISO can introduce noise (grain) into your images.
White balance ensures accurate color representation. Different lighting conditions have different color temperatures. Your camera app offers presets for various scenarios like daylight, cloudy, fluorescent, and incandescent.
Finally, explore features like HDR (High Dynamic Range) which helps capture details in both shadows and highlights, and gridlines that can assist with composition, applying the rule of thirds.
Composition Techniques for Stunning Photos
Composition is key to creating visually appealing photographs. The Rule of Thirds is a fundamental guideline. Imagine your screen divided into nine equal parts by two horizontal and two vertical lines. Placing your subject at the intersection of these lines creates a more balanced and engaging image.
Leading lines, like roads or fences, can draw the viewer’s eye towards your subject. Experiment with different angles and perspectives. Shooting from a low angle can make your subject appear larger and more powerful, while a high angle can provide a unique overview.
Consider the negative space around your subject. This empty space can emphasize the subject and create a sense of minimalism. Don’t be afraid to experiment with symmetry and patterns for visually striking results. Framing your subject with natural elements, like arches or foliage, can add depth and interest to your photos.
Lighting Mastery: Natural vs. Artificial Light
Light is the cornerstone of photography. Understanding how to use both natural and artificial light sources is crucial for capturing compelling images with your phone.
Natural Light: The Photographer’s Best Friend
Natural light, especially during the golden hour (sunrise and sunset), offers soft, warm, and diffused illumination. Overcast days provide a naturally diffused light, perfect for portraits and minimizing harsh shadows.
Artificial Light: Taking Control
Artificial light sources, such as lamps or overhead lighting, require careful consideration. Be mindful of the color temperature, which can impact the mood and overall look of your photo. Experiment with positioning to create interesting highlights and shadows.
Balancing the Two
Sometimes, combining natural and artificial light can yield the best results. Use natural light as your primary source and supplement it with artificial light to fill in shadows or add a specific effect.
Exploring Different Shooting Modes
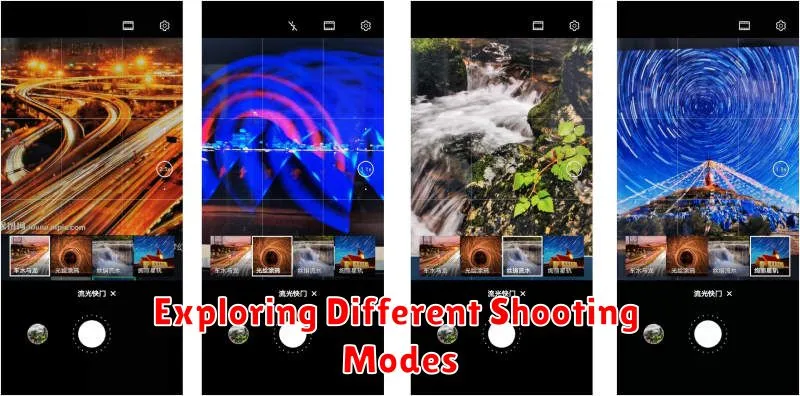
Unlock your phone’s photographic potential by delving into its diverse shooting modes. Understanding these modes empowers you to capture various scenes effectively and creatively.
Panorama mode is perfect for capturing breathtaking landscapes or expansive cityscapes. By seamlessly stitching together multiple images, it creates a wide-angle view that a standard shot can’t achieve.
Burst mode is ideal for capturing fast-paced action. Hold down the shutter button to take a rapid sequence of photos, ensuring you don’t miss that decisive moment. This is particularly useful for sports photography or capturing playful pets.
Experiment with slow-motion video to add a dramatic flair to your videos. This mode captures more frames per second, allowing you to slow down the footage and highlight subtle details.
Consider utilizing time-lapse photography to showcase the passage of time in a captivating manner. This mode captures images at set intervals, creating a video that condenses a longer duration into a shorter, more visually engaging sequence.
Many phone cameras offer a dedicated night mode designed for low-light situations. This mode optimizes settings to reduce noise and capture brighter, clearer images in challenging lighting conditions.
Editing Essentials for a Polished Look
Editing is a crucial step in elevating your mobile photography. A few tweaks can transform a good photo into a great one. Numerous photo editing apps offer a range of tools, from basic adjustments to advanced features. Choose an app that suits your needs and skill level.
Start with the fundamentals. Adjusting brightness, contrast, and saturation can significantly impact an image’s overall look. Be subtle; avoid over-editing, which can make photos appear unnatural. Experiment with cropping to improve composition and remove distracting elements. Straightening the horizon is another simple yet effective edit.
Explore more advanced editing tools like selective adjustments. These allow you to target specific areas of your photo to fine-tune brightness, contrast, or saturation. Consider using filters sparingly to add a stylistic touch or enhance the mood. Remember, the goal is to enhance your photos, not mask them.
Accessorize Your Phone Camera for Pro Results

While modern smartphones boast impressive built-in camera capabilities, strategic accessorizing can significantly elevate your mobile photography. Investing in a few key tools can unlock a world of creative possibilities and help you achieve professional-looking results.
Lenses: External lenses offer expanded versatility. A wide-angle lens captures expansive landscapes, while a macro lens reveals intricate details in close-up shots. Telephoto lenses bring distant subjects closer, ideal for wildlife or sports photography.
Tripods: Eliminate shaky shots and unlock long-exposure techniques with a tripod. From compact, flexible options to more robust models, a tripod provides stability for sharper images, especially in low-light conditions.
Lighting: Supplemental lighting can drastically improve image quality. Portable LED panels or ring lights provide consistent, flattering illumination, particularly for portraits and video recording. Consider a diffuser to soften harsh light sources.
Gimbal Stabilizer: For smooth, cinematic video footage, a gimbal stabilizer is indispensable. It counteracts handshake and movement, resulting in professional-looking, stable shots, even when walking or moving dynamically.
Tips for Capturing Action and Motion
Freezing a fleeting moment or conveying a sense of speed with your phone camera requires understanding a few key techniques. Burst mode is your best friend for capturing action. Hold down the shutter button to take a rapid series of photos, then select the sharpest image where the action is frozen perfectly.
Panning is another effective technique. As your subject moves, follow it with your camera, keeping it in the same position within the frame. This creates a blurred background, emphasizing the subject’s motion and speed. Practice smooth, consistent movements for the best results.
Consider using your phone’s sports mode if available. This mode automatically adjusts settings to prioritize faster shutter speeds, helping to freeze motion. Experiment with these techniques to master the art of capturing dynamic action shots.
The Art of Mobile Portrait Photography
Capturing stunning portraits with your phone involves understanding a few key elements. Lighting plays a crucial role; utilize natural light whenever possible, opting for soft, diffused light rather than harsh direct sunlight. Position your subject facing the light source for even illumination, or experiment with backlighting for a creative silhouette effect.
Composition is equally important. The rule of thirds can help create visually appealing portraits. Imagine your screen divided into nine equal sections by two horizontal and two vertical lines. Placing key elements along these lines or at their intersections can enhance the image’s balance. Experiment with different angles and perspectives, moving closer to your subject for a more intimate feel or further away to showcase their surroundings.
Consider the background. A cluttered background can distract from your subject. Look for simple, uncluttered backdrops that complement your subject. Using portrait mode can further enhance your images by blurring the background and creating a shallow depth of field, drawing attention to the subject.
Creating Captivating Videos with Your Phone
Your phone is a powerful video creation tool. Mastering a few key techniques can dramatically enhance your mobile videography.
Understanding Video Settings
Explore your phone’s video settings. Resolution and frame rate are crucial. Higher resolution (like 4K) provides more detail, while higher frame rates (like 60fps) produce smoother motion. Experiment to find the best balance for your needs.
Stabilization is Key
Shaky footage can ruin a video. Utilize your phone’s built-in stabilization or invest in a small tripod for steady shots. Smooth, professional-looking videos are more engaging and visually appealing.
Mastering Focus and Exposure
Just like still photography, focus and exposure are critical. Tap the screen to set your focus point and adjust exposure by sliding your finger up or down. This allows you to control the brightness of your video and highlight your subject effectively.
Consider Audio
While visuals are important, audio is just as crucial. Use an external microphone if possible for clearer sound. Minimize background noise and be mindful of wind interference when recording outdoors.