

In today’s digital world, screenshots have become an indispensable tool for communication, documentation, and sharing information. Whether you need to capture a funny meme, report a technical issue, or save important data, knowing how to take a screenshot on your Android device is essential. This comprehensive guide will delve into the various methods of capturing your screen on Android, covering everything from basic techniques to advanced features. Learn how to take screenshots on different Android versions and manufacturers, discover tips for editing and sharing your captures, and explore the capabilities of third-party screenshot apps.
Mastering the art of the screenshot can significantly enhance your Android experience. From troubleshooting problems to preserving precious memories, the ability to capture your screen provides a valuable function for both personal and professional use. This guide will equip you with the knowledge to confidently capture screenshots on any Android device, regardless of the manufacturer or operating system version. Explore the myriad of methods available, discover how to customize your screenshots, and unlock the full potential of this powerful tool. Join us as we unlock the secrets to capturing your screen on Android.
Standard Screenshot Methods: Buttons and Gestures
Most Android devices utilize a combination of physical buttons and gestures to capture screenshots. The most common method involves simultaneously pressing the Power and Volume Down buttons.
Hold these buttons for a brief moment until you hear a shutter sound or see a visual animation indicating the capture. The screenshot will then be saved to your device’s gallery.
Alternatively, many Android phones offer gesture-based screenshots. These can vary depending on the device manufacturer and Android version. Common gestures include a three-finger swipe down or a palm swipe across the screen.
Check your device’s settings or user manual to identify the specific gesture supported by your phone. These gesture controls can often be customized or disabled within the settings menu.
Using Scrolling Screenshots for Extended Content
Sometimes, a standard screenshot isn’t enough to capture everything on your screen. This is where scrolling screenshots become invaluable. They allow you to capture content that extends beyond what’s immediately visible, creating a single, long image of, for example, a webpage, a chat conversation, or a document.
The availability and functionality of scrolling screenshots might vary depending on your Android device’s manufacturer and Android version. Generally, after taking a standard screenshot, a “Scroll” or “Capture more” button or icon appears at the bottom of the screen. Tapping this option will extend the screenshot downwards, capturing more of the content. You can repeat this process until you’ve captured everything you need.
Important Note: Not all apps support scrolling screenshots. If the “Scroll” option doesn’t appear or becomes grayed out, the app likely doesn’t allow extended capture.
Once you’re finished, you can preview and edit the extended screenshot before saving or sharing it. Look for options to crop, annotate, or adjust the image as needed.
Alternative Screenshot Apps and Features
While built-in methods usually suffice, third-party apps can offer extended functionality for screenshots. These apps often provide features like scrolling screenshots for capturing entire webpages, image editing tools, and easy sharing options.
Some apps specialize in capturing specific content. For example, some might excel at capturing game screens, while others focus on creating long screenshots of articles or chat conversations. These specialized apps often come with features tailored to their target use case.
Furthermore, certain device manufacturers include custom screenshot features within their Android builds. These might involve additional gestures, expanded editing options, or dedicated screenshot toolbars that appear after capture. Exploring your device’s settings can reveal any manufacturer-specific screenshot capabilities.
Editing and Sharing Your Screenshots
After capturing a screenshot, Android offers various tools to edit and share it. Most Android devices provide basic editing tools directly accessible after taking a screenshot. These tools commonly include cropping, marking up with a pen or highlighter, and adding text annotations. These features allow you to quickly highlight important information or remove unnecessary parts of the image.
Sharing your screenshot is equally straightforward. The share sheet, accessible from the screenshot notification or within your gallery app, allows you to quickly send the image through various applications. Common sharing options include messaging apps, email, social media platforms, and cloud storage services. You can select the desired application and recipient directly from the share sheet.
For more advanced editing, numerous photo editing apps are available on the Google Play Store. These apps offer extensive features, including filters, advanced cropping tools, and the ability to add stickers or other visual elements.
Troubleshooting Common Screenshot Issues
Occasionally, you might encounter issues when trying to capture a screenshot. Here are some common problems and their solutions:
Storage Problems
If you receive a “Couldn’t capture screenshot” error, it often relates to insufficient storage. Ensure you have enough free space on your device’s internal storage or SD card (if screenshots are saved there). Delete unnecessary files or apps to free up space.
Security Restrictions
Some apps, particularly banking or secure messaging apps, may restrict screenshots for security reasons. This is a deliberate feature to protect sensitive data, and you won’t be able to override it.
Device-Specific Issues
Rarely, a software bug or hardware problem might prevent screenshots. Restarting your device can sometimes resolve these temporary glitches. If the problem persists, consider contacting your device manufacturer’s support.
Device-Specific Screenshot Instructions
While the standard Android screenshot method usually works across most devices, some manufacturers have implemented unique procedures. Understanding these device-specific methods can ensure you capture your screen successfully, regardless of your Android phone model.
Common Manufacturer-Specific Instructions:
Samsung Devices: Typically, press and hold the Power and Volume Down buttons simultaneously. Some older Samsung devices might utilize the Home and Power buttons instead.
Google Pixel Devices: Press and hold the Power button and select the Screenshot option.
Other Manufacturers: Most other Android manufacturers, such as LG, Motorola, and OnePlus, utilize the standard Android method (Power + Volume Down). However, consulting your device’s user manual is always recommended for confirmation.
Navigating Specific Models: Due to the vast number of Android models, variations may exist even within a single manufacturer’s lineup. If the common instructions don’t work, refer to your device’s user manual or contact the manufacturer’s support for assistance. This ensures you’re using the correct combination of buttons or gestures for your specific model.
Tips for Taking High-Quality Screenshots
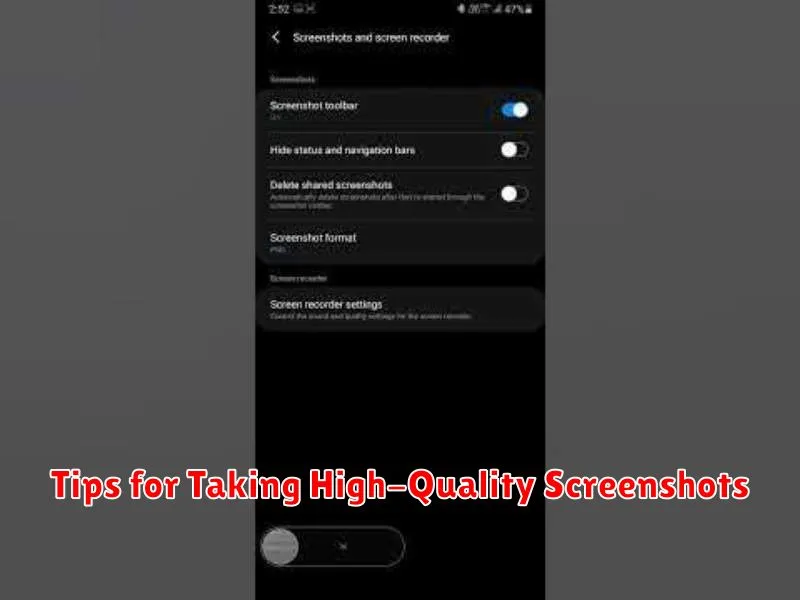
Taking a clear and effective screenshot is more than just pressing a button. Consider these tips to ensure high-quality captures:
Clean Up Your Screen: Close unnecessary apps and notifications to avoid clutter and ensure the focus remains on the content you want to capture. A tidy screen results in a more professional and understandable screenshot.
Adjust Brightness Appropriately: Ensure your screen’s brightness is set at an optimal level. Too dim and the screenshot might be difficult to see; too bright and details can be washed out.
Check Resolution: While most modern Android devices offer high-resolution screenshots, double-check your device’s settings. A higher resolution captures more detail, particularly beneficial when showcasing small text or intricate visuals.
Crop and Edit: After capturing your screenshot, use the built-in editing tools or a third-party app to crop out unnecessary elements and refine the image. Cropping enhances the clarity and directs attention to the relevant content.