

Inserting a memory card might seem like a straightforward task, but with the variety of devices and memory card types available, it’s essential to understand the correct procedures for each. This simple guide will provide a comprehensive overview of inserting memory cards into different devices, including digital cameras, smartphones, laptops, and gaming consoles. Understanding the nuances of memory card insertion will ensure the safety of your data and the optimal performance of your devices.
Whether you’re a professional photographer dealing with SD cards, a mobile gamer utilizing microSD cards, or a laptop user expanding storage with an SD card, this guide will offer clear and concise instructions. We’ll cover identifying the correct memory card slot, understanding the orientation for insertion, and safely inserting and removing your memory cards to prevent data loss or damage to your device and the memory card itself. Learn the proper techniques for memory card insertion and ensure seamless integration with your various devices.
Identifying the Memory Card Slot
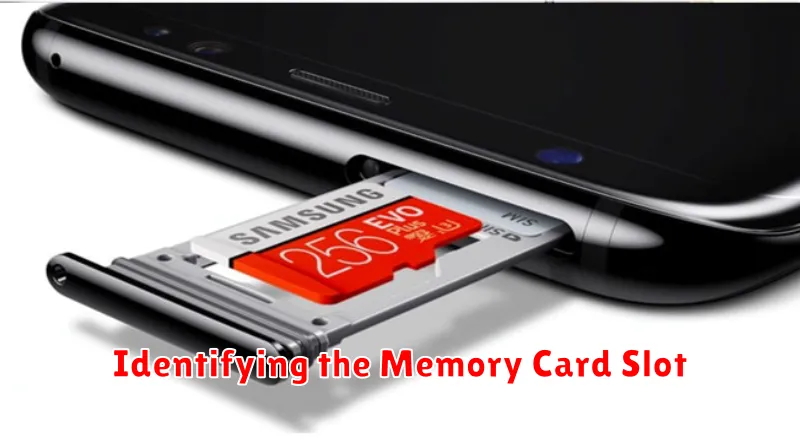
Locating the memory card slot is the first step in the insertion process. Its location varies depending on the device. Carefully examine your device for a small, slot-shaped opening, often labeled with an SD card icon or similar symbol. Common locations include:
- Side of the device: Many smartphones, tablets, and cameras place the slot along the edge.
- Underneath a battery compartment: Some older devices or those with removable batteries hide the slot here.
- Behind a small cover or door: Certain devices use a protective cover to keep the slot clean and dust-free.
- Front of the device: Less common, but some devices, especially older laptops, might have the slot on the front panel.
If you are unsure, consult your device’s user manual for precise instructions and a visual representation of the slot’s location.
Choosing the Right Memory Card
Selecting the appropriate memory card is crucial for optimal device performance and data storage. Different devices support various memory card formats, and understanding these differences is essential. Common formats include SD (Secure Digital) cards, microSD cards, and CompactFlash cards. Check your device’s user manual or specifications to determine the compatible format.
Beyond the format, consider the card’s capacity, measured in gigabytes (GB) or terabytes (TB). A higher capacity allows you to store more data, such as photos, videos, or applications. Think about your storage needs when selecting a card.
Finally, speed class ratings are important. These ratings, indicated by a number within a circle (e.g., 4, 6, 10), represent the minimum sustained write speed. Higher speed classes are beneficial for recording high-definition video or transferring large files quickly. Look for a speed class that matches your intended use.
Preparing the Memory Card
Before inserting your memory card, it’s crucial to ensure it’s properly prepared. This involves a few key steps to ensure optimal performance and prevent data loss.
Formatting the Card
If the memory card is new or has been used in a different device, it is often recommended to format it. Formatting erases all data on the card and sets it up for use in your specific device. Consult your device’s user manual for instructions on how to format the memory card correctly.
Checking for Errors
Some devices offer the ability to check the memory card for errors. This process scans the card for any physical or logical issues. Addressing these potential problems before using the card can prevent data corruption.
Inserting the Memory Card Correctly
Once you’ve identified the correct slot and chosen the right memory card, it’s time to insert it. Orientation is key. Look for a notch or angled corner on the memory card. This corresponds to a similar feature in the memory card slot. Aligning these ensures the card is inserted in the correct direction.
Gently slide the memory card into the slot. You should feel a slight resistance, and then the card will click into place. Do not force the card if it doesn’t slide in easily. Double-check the orientation and try again. Forcing the card can damage both the card and the device.
Different devices have varying mechanisms for securing the card. Some slots have a small spring-loaded mechanism that locks the card in place. Others may require you to push the card in until it clicks and then release it to lock. Pay attention to how the card feels as it is inserted.
Verifying the Memory Card Installation
After inserting the memory card, it’s crucial to verify its proper installation. The verification process differs slightly depending on the device. Here are some common methods:
Device Specific Checks
- Cameras: Most cameras will display a storage icon indicating the presence of a memory card. Some may briefly display the card’s capacity or remaining space. Try taking a picture or recording a short video to confirm functionality.
- Smartphones/Tablets: A notification usually appears confirming the new storage device. Check the device’s storage settings to see the memory card listed and its available space.
- Computers: If using a card reader, the computer should recognize the memory card as a new drive. It will typically appear in the file explorer or desktop.
- Other Devices: Consult the device’s user manual for specific instructions on verifying memory card installation.
If the memory card is not recognized, safely remove and reinsert it, ensuring proper orientation and a secure fit. If issues persist, try the card in another compatible device to rule out a device malfunction or a problem with the card itself.
Troubleshooting Memory Card Issues
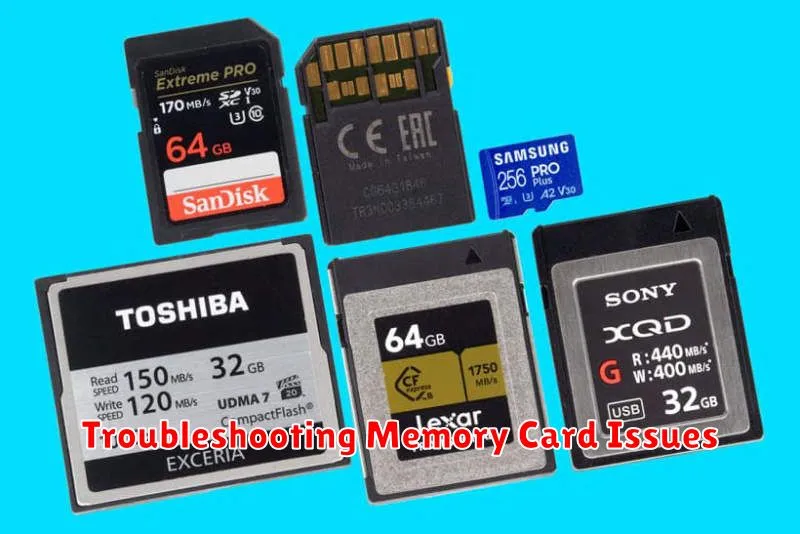
Occasionally, you might encounter problems with your memory card. Here are some common issues and solutions:
Card Not Recognized
If your device doesn’t recognize the card, ensure it’s inserted correctly. Check for any physical damage to the card or the device’s slot. Try the card in another compatible device to isolate the problem.
“Card Error” Message
This message can indicate a variety of issues. Try restarting your device. If the problem persists, the card might be corrupted. Consider formatting the card, but remember this will erase all data.
Slow Transfer Speeds
Slow transfer speeds can be caused by a low-speed card or interference from other devices. Ensure you’re using a card with an appropriate speed class for your device. Try moving away from potential sources of interference.
“Write-Protected” Error
If you can’t save data to the card, check for a physical write-protection switch on the card itself. Slide the switch to the unlocked position.
Formatting the Memory Card (Optional)
Formatting a memory card erases all data stored on it and prepares it for use by a specific device. While not always required, formatting can resolve performance issues or compatibility problems. Always back up important data before formatting.
The formatting process usually involves accessing the device’s settings menu. The specific steps may vary depending on the device. Common locations for the format option include storage settings, camera settings, or file management utilities. Consult your device’s user manual for detailed instructions.
Different file systems are available for formatting, such as FAT32, exFAT, and NTFS. Choosing the appropriate file system depends on the device and the size of the memory card. Generally, FAT32 is suitable for smaller cards and older devices, while exFAT is better for larger cards and offers greater compatibility with modern devices.
Safely Removing the Memory Card
Improper removal of a memory card can lead to data corruption or damage to the card or device. Always follow the correct procedure to ensure safe removal. The process varies slightly depending on the device.
For many devices, like cameras and some older devices, simply turning the device off before removing the card is sufficient. However, modern operating systems often require a “safe removal” process.
For computers, locate the “safely remove hardware” icon, usually in the system tray (Windows) or menu bar (macOS). Click the icon and select the memory card to eject. Wait for confirmation that it’s safe to remove the hardware before physically unmounting it.
On smartphones and tablets, the process might involve “unmounting” or “ejecting” the SD card through the storage settings. Consult your device’s user manual for specific instructions.
Once you receive confirmation, gently pull the card straight out from its slot. Avoid bending or forcing the card.