

Unlock the full potential of your Android device with our comprehensive guide to Developer Options. This often-overlooked treasure trove of settings allows you to customize your Android experience far beyond the standard user interface. Whether you’re a seasoned developer, a curious tech enthusiast, or simply looking to boost your device’s performance, understanding Developer Options can open a world of possibilities. From fine-tuning animations and improving USB debugging connectivity to enabling advanced developer tools, this guide will demystify these powerful hidden features and empower you to take control of your Android experience. Learn how to access Developer Options, navigate its numerous settings, and harness its capabilities to transform your device.
Dive deep into the intricacies of Developer Options and discover how to tailor your Android device to your precise needs. This guide provides clear explanations and practical advice on utilizing key features, such as adjusting animation scales, enabling USB debugging for seamless interaction with your computer, and accessing powerful developer tools. Unlocking the hidden features within Developer Options can enhance your device’s performance, streamline your workflow, and unlock a world of customization. Whether you’re interested in optimizing battery life, improving gaming performance, or simply exploring the advanced capabilities of your Android device, this guide is your key to unleashing the true power of Developer Options.
Accessing Developer Options: A Step-by-Step Guide
Unlocking Android’s Developer Options is straightforward. Begin by opening your device’s Settings menu. The process varies slightly depending on your Android version and manufacturer, but the general steps are the same.
Locate the About Phone or About Device section within Settings. Here, you’ll find Build Number. Tap on the Build Number repeatedly. After several taps, a toast notification will appear, informing you that you are now a few steps away from being a developer.
Continue tapping the Build Number. You’ll see another notification showing the number of taps remaining. Once you’ve tapped the required number of times (usually seven), Developer Options will be enabled. You’ll typically find this new option in the main Settings menu or within a System or System & updates submenu.
Key Developer Options for Performance Tuning
Several Developer Options directly impact your device’s performance. Understanding these options can lead to a smoother, faster experience.
Window Animation Scale
This setting controls the speed of window transitions. A lower value results in snappier animations, while a higher value slows them down. Disabling window animations entirely can make your phone feel significantly faster.
Transition Animation Scale
Similar to window animation scale, this setting adjusts the speed of transitions between activities. Reducing this value can also contribute to a perceived performance boost.
Animator Duration Scale
This option affects the duration of animations within applications. Lowering this value can make app interactions feel more responsive.
Hardware-Accelerated Rendering
These options (such as Force GPU rendering and Force 4x MSAA) offload graphical processing to the GPU, potentially improving performance in some apps but may impact battery life. Experiment to see what works best for your device.
Debugging and Testing with Developer Options
Developer Options offers a suite of tools specifically designed for debugging and testing Android applications and the system itself. These features provide valuable insights into app behavior and performance, allowing developers to identify and resolve issues effectively.
Key Debugging and Testing Options:
Show touches: Visually displays touch input on the screen, useful for identifying touch responsiveness issues.
Pointer location: Displays the coordinates of the last touch event, essential for precise UI testing and calibration.
Layout bounds: Shows the boundaries of all layouts on the screen, assisting with UI design and debugging.
Profile GPU rendering: Visualizes GPU activity, helpful for analyzing performance bottlenecks in graphics-intensive applications.
Enable GPU debug layers: Provides more detailed information about GPU activity for advanced debugging.
These tools empower developers to comprehensively test and debug their apps, ensuring a smooth and optimized user experience.
USB Debugging and its Uses
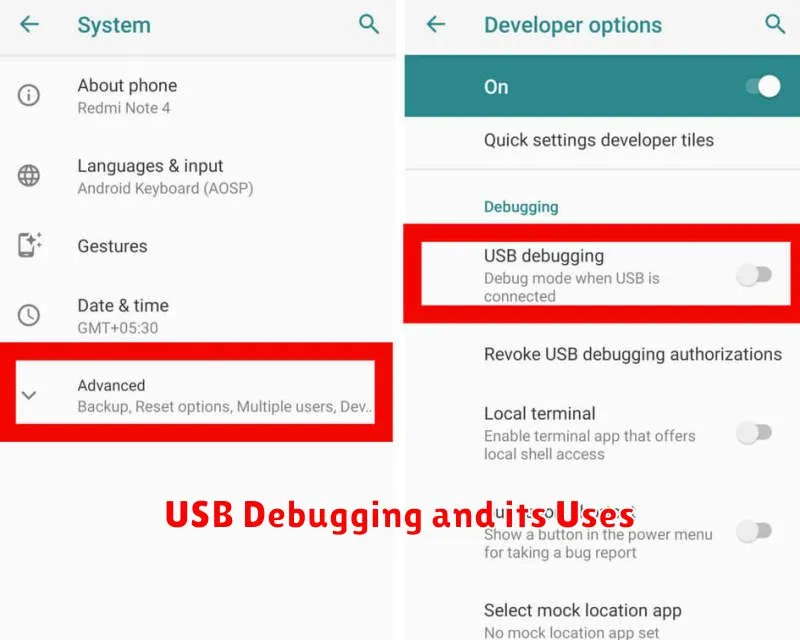
USB Debugging is a crucial tool for Android developers and advanced users. It establishes a direct connection between your Android device and a computer, primarily for software development and testing.
Enabling USB Debugging allows a variety of actions, most notably the ability to transfer data, install applications directly from your computer, and read system logs for troubleshooting purposes. This feature is essential for using the Android Debug Bridge (ADB), a command-line tool that allows you to interact with your device in a more technical way.
Common uses of USB Debugging include:
- App installation: Sideloading apps onto your device without using the Google Play Store.
- File transfer: Quickly moving files between your computer and your Android device.
- System backups and restores: Creating full backups of your device’s data or restoring from a previous backup.
- Advanced debugging: Identifying and resolving application crashes and other software issues.
While USB Debugging offers substantial benefits, it is important to be mindful of security risks. When enabled, your device becomes more vulnerable if connected to untrusted computers or networks. Therefore, exercise caution and disable it when not actively in use.
Advanced Developer Options for Experienced Users
For users comfortable with Android’s intricacies, several advanced developer options offer granular control over the system. Mock Locations allows you to set a fake GPS location for testing location-based apps. This is crucial for developers verifying location services functionality.
Show CPU Usage overlays real-time CPU usage information on screen, offering insights into system performance. Enable GPU debug layers provides detailed information about GPU rendering, useful for graphics optimization.
Tweaking Animation scale options allows you to speed up or slow down system animations, providing visual customizations or troubleshooting performance issues. Force RTL layout direction forces right-to-left layout for testing app compatibility with different language settings.
Don’t keep activities destroys every activity as soon as the user leaves it. This is helpful for testing app behavior and resource management, but can impact normal phone use. Background process limit restricts the number of processes running in the background, offering further control over system resources.
Potential Risks and Considerations
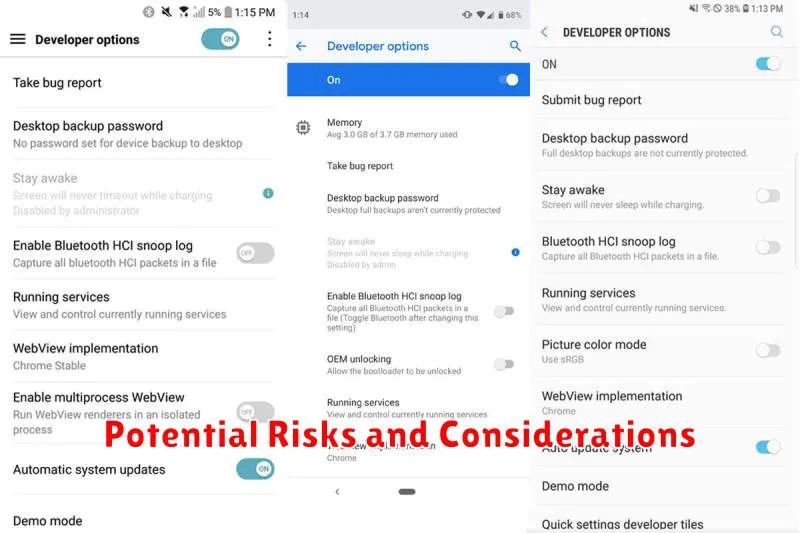
While Developer Options offer exciting customization possibilities, it’s crucial to understand the potential risks involved. Modifying certain settings without proper knowledge can lead to unexpected behavior and even compromise your device’s stability and security.
Data loss is a significant concern. Enabling certain debugging features or altering system settings could inadvertently erase data. Always back up important information before making changes.
Performance issues can arise from tweaking settings related to animations, background processes, or hardware acceleration. Changes might lead to sluggishness, battery drain, or app instability.
Security vulnerabilities are a potential consequence of altering security-related settings. Disabling certain security features can make your device more susceptible to malware and unauthorized access.
Exercise caution and discretion when exploring Developer Options. Thoroughly research any setting before modification. If unsure about a setting’s purpose, it’s best to leave it unchanged.
Restoring Default Settings
If you’ve experimented with Developer Options and wish to revert to the original settings, Android provides a straightforward way to do so. This process removes any customized configurations within the Developer Options menu and sets them back to the manufacturer’s default state.
The method for resetting Developer Options can vary slightly between Android versions and manufacturers. Generally, the option is located within the Developer Options menu itself. Look for a button or option labeled “Reset to default settings” or similar. Tapping this will restore the default configurations.
In some cases, you might find the reset option under the main system settings menu. Navigate to Settings > System > Developer Options. Here, you may find the “Reset” option. This action will disable Developer Options and revert all settings to their defaults.
After resetting, the Developer Options menu itself might become hidden again. If you wish to re-enable it, you will need to follow the same activation process as before.