

In today’s digital age, our iPhones have become indispensable repositories of precious memories, essential contacts, and vital information. Losing this data can be devastating, disrupting both personal and professional lives. This comprehensive guide to iPhone backup provides a detailed exploration of the various methods available, ensuring the safety and security of your invaluable data. We will cover everything from understanding the importance of regular backups to mastering the intricacies of iCloud, iTunes (now Finder for macOS Catalina and later), and third-party backup solutions. Whether you’re a tech novice or a seasoned iPhone user, this guide will empower you with the knowledge to protect your digital life effectively.
From accidental deletions and hardware malfunctions to software updates gone awry, the risks to your iPhone data are numerous. This guide will equip you with the necessary tools and knowledge to safeguard your data through consistent and effective iPhone backups. Learn how to choose the backup method best suited to your needs, understand the differences between iCloud backups and local backups, and gain proficiency in restoring your data should the unfortunate occur. Take control of your digital well-being and ensure your peace of mind by prioritizing the safety and security of your iPhone’s invaluable content. Join us as we delve into the world of iPhone data protection and unlock the secrets to a secure digital future.
Understanding the Importance of iPhone Backups
Regular iPhone backups are crucial for protecting your valuable data. Losing your iPhone due to theft, damage, or a simple software glitch can be devastating. A recent backup ensures you can quickly restore your information onto a new or repaired device, minimizing disruption.
Beyond device replacement, backups also provide a safety net against accidental data deletion. Whether you mistakenly delete important contacts, photos, or messages, a backup allows you to recover that information with ease. This can save you significant time and stress.
Protecting your memories, including photos and videos, is another key benefit. These often hold irreplaceable sentimental value, and a backup ensures their preservation even if your device is lost or damaged.
Finally, backups are essential when upgrading to a new iPhone. Restoring from a backup seamlessly transfers all your data, settings, and preferences, making the transition smooth and hassle-free.
Different Methods for Backing Up Your iPhone
Safeguarding your iPhone’s data is crucial, and thankfully, Apple provides multiple avenues for creating backups. You can choose between cloud-based storage with iCloud or local backups using your computer with iTunes (for Windows and older macOS versions) or Finder (for macOS Catalina and later). Each method offers distinct advantages depending on your needs and preferences.
iCloud backups offer the convenience of automatic, wireless backups when your device is connected to Wi-Fi and power. This method is ideal for users who prioritize simplicity and accessibility.
iTunes/Finder backups, on the other hand, provide more granular control over the backup process. You can encrypt your backups for enhanced security and typically experience faster backup and restore speeds compared to iCloud.
Choosing the right backup method depends on factors like storage availability, security preferences, and internet access. Understanding these differences will help you select the most suitable option to ensure your data’s safety.
Backing Up Your iPhone with iCloud
iCloud offers a convenient and seamless way to back up your iPhone wirelessly. This method allows you to automatically save your data to the cloud, ensuring its safety and accessibility. Automatic Backups are a key feature of iCloud, enabling your device to back up when it’s connected to Wi-Fi, locked, and plugged into power.
To enable iCloud Backup, navigate to the Settings app, tap on your Apple ID at the top, select iCloud, and then choose iCloud Backup. Toggle the iCloud Backup switch to the on position. You can also initiate a manual backup from this menu by tapping Back Up Now.
iCloud provides 5GB of free storage. This storage is shared across all your iCloud services, including photos, files, and backups. If you require more storage, you can purchase an iCloud+ subscription, which offers various storage tiers to accommodate your needs.
Using iTunes or Finder for iPhone Backups
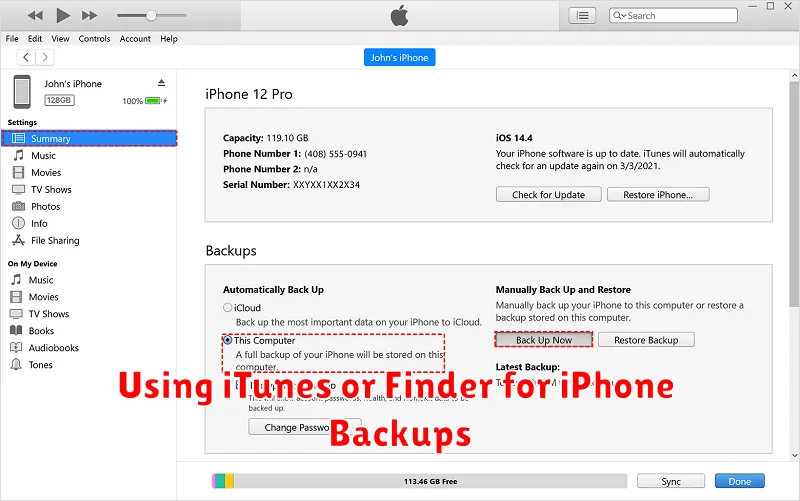
Backing up your iPhone using iTunes (for Windows PCs and older macOS versions) or Finder (for macOS Catalina and later) provides an alternative to iCloud backups. This method stores your backup data locally on your computer. This is a good option for those with limited internet bandwidth or who prefer having their data physically stored.
Connect your iPhone to your computer. Use the appropriate USB cable.
Open iTunes or Finder. Your iPhone should be recognized in the application.
Locate your iPhone. In iTunes, click the phone icon. In Finder, find your iPhone under Locations.
Select the Backups tab. This area lets you manage backup options.
Choose “Back Up Now”. This initiates a full backup of your iPhone’s data to your computer.
Encrypt your backup (optional). Selecting “Encrypt local backup” adds an extra layer of security by password-protecting sensitive data like health information and saved passwords. Remember this password as it is crucial for restoring the encrypted backup.
Managing Your iPhone Backups
Effectively managing your iPhone backups is crucial for optimizing storage and ensuring you have access to the most relevant data. Regularly reviewing your backups allows you to delete outdated versions, freeing up valuable space on iCloud or your computer.
Within iCloud, you can manage backups by navigating to Settings, then your Apple ID, iCloud, and finally, Manage Storage. Here, you’ll see a list of your devices and their associated backups. You can choose to delete older backups that are no longer needed.
For backups created using iTunes or Finder, locating and managing them depends on your operating system. On a Mac, within Finder, you can access Manage Backups to see a list of available backups and delete as necessary. Windows users can do the same within iTunes.
Be mindful of which data is included in each backup. Certain data, such as photos and videos already stored in iCloud Photo Library, may not be duplicated in your device backup. Understanding these nuances can help you efficiently manage your storage.
Restoring Your iPhone from a Backup
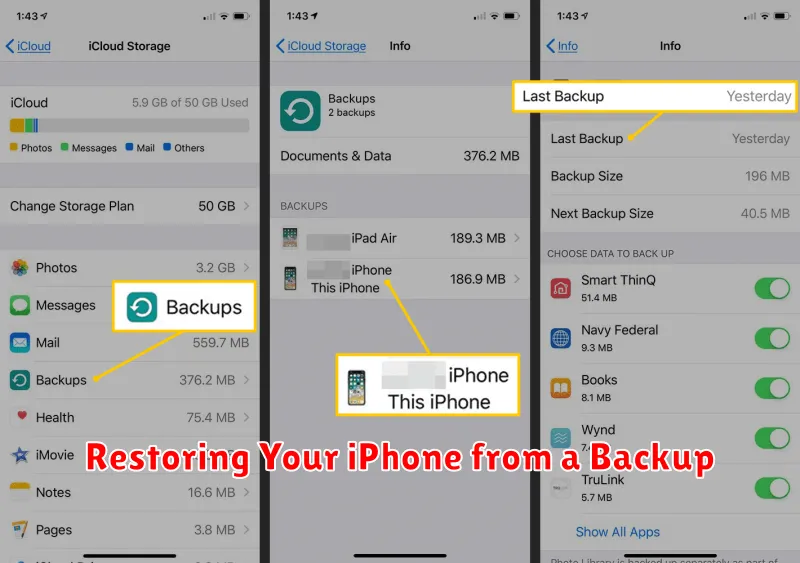
Restoring your iPhone from a backup returns your device to a previous state, including apps, data, settings, and preferences. This process is crucial for recovering information after data loss, upgrading to a new device, or troubleshooting software issues.
There are two primary methods for restoring your iPhone: from an iCloud backup or from a computer backup created using Finder (macOS Catalina or later) or iTunes (earlier macOS versions and Windows).
Restoring from iCloud Backup
This method requires a Wi-Fi connection. During the initial iPhone setup or after a factory reset, select the option to restore from an iCloud backup. You will need your Apple ID and password associated with the backup.
Restoring from a Computer Backup
Connect your iPhone to your computer and open Finder or iTunes. Select your device and choose the “Restore Backup” option. Select the relevant backup from the available list and follow the on-screen prompts. Ensure your computer has sufficient storage space to accommodate the backup file.
Important: The restoration process can take time depending on the backup size and network speed (for iCloud restores). Ensure your device remains connected to power and the internet (if applicable) throughout the entire process.
Troubleshooting Backup and Restore Issues
Encountering problems during backup or restore? Here are some common issues and solutions:
Backup Issues
Insufficient Storage: If your backup fails due to insufficient storage, you’ll need to free up space on your iCloud account or computer. Consider deleting old backups, removing unnecessary files, or upgrading your storage plan.
Connection Problems: Ensure a stable internet connection for iCloud backups and a proper connection to your computer for iTunes/Finder backups.
Unknown Error: Restarting your iPhone and computer can sometimes resolve unexplained backup errors. Updating to the latest version of iOS and iTunes/Finder is also recommended.
Restore Issues
Incorrect Password: Double-check that you’re entering the correct Apple ID password associated with the backup.
Compatibility Issues: You cannot restore a backup from a newer iOS version to an older one. Ensure your device is running a compatible iOS version.
Incomplete Restore: If only some data is restored, try the restore process again. A second attempt can often fix minor glitches.
Best Practices for Regular iPhone Backups
Implementing a consistent backup strategy is crucial for safeguarding your iPhone’s data. Regular backups ensure that even in the event of device loss, theft, or malfunction, your information remains retrievable.
Establish a routine backup schedule. Consider backing up weekly, or even daily if you frequently create or modify important data. Leverage both iCloud and computer backups for comprehensive protection. iCloud offers automated backups while connected to Wi-Fi and power, providing a seamless off-site solution.
Optimize iCloud storage by managing which apps are included in the backup and deleting unnecessary data. For archiving specific data, consider creating encrypted backups on your computer. Prior to any major iOS update, a backup is strongly recommended as a precautionary measure.